The weather

sábado, 25 de mayo de 2019

Final project

Hi!
Today I show you my last project. I have developed it with scratch.

In this year, we have learnt:
  • Development of Applications for mobile devices.
  • Programming with Scratch.
  • Simulated electronics and physics.
  • Robotics programmed by Arduino microcontroller.
  • Web design with New Google Sites and through HTML.
  • 3D design.
  • Google documents and spreadsheets.
  • Google presentations

I had to carry out an original project as an end-of-course project.


viernes, 10 de mayo de 2019

Mother's day design

Today I'm going to use Tinkercad to do a well-deserved tribute to my mum.
For this I have designed a heart-shaped key ring with the name of my mother in relief and mine at the back.
It's a very useful practice because it combines creativity and latest technology, all experts believe that 3D printing will change the engineering of manufacturing.

Click here to see the design


lunes, 8 de abril de 2019

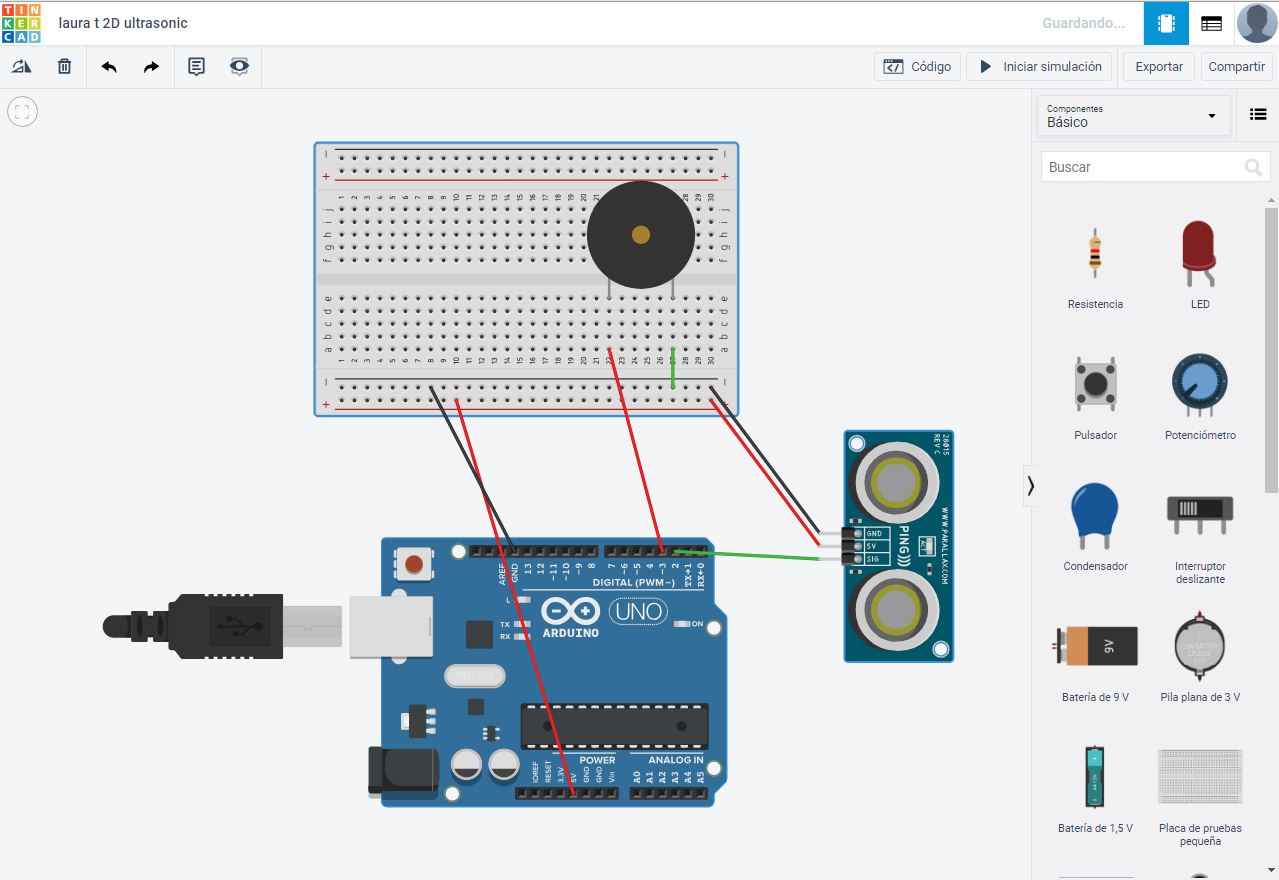
Ultrasonic distance sensor with different distances

Good morning friends!!

Today we present to you an electronic project consisting of an alarm that is activated when it detects an object less than 40 centimetres away.

The elements are:
  • Arduino.
  • Protoboard
  • Cables
  • Ultrasonic sensor
  • Speaker
The operation is as follows:

When the sensor detects an object less than 40 cm away, it sends a HIGH signal to pin 2 of the Arduino, which we have programmed to send in that case a HIGH signal, through pin 3 that activates the speaker in order to sound the alarm.


This way the parking sensors work, also a Lunar Rover, could use it not to collide with rocks.


Click here to see the design


lunes, 1 de abril de 2019

App animals and sounds

Good morning,

Today we present you a design of an app. It has buttons with photos of animals and vehicles. When you press the photos the sounds are emitted.

The animals have been downloaded from google images, eye of the initial grid, so that they are small, selecting the image with the right button and save image as.

In App inventor we have to put buttons, deleting the text and putting of image of the button the photos of the animals.

Then in average, we drag the 8 sounds, assigning to each sound a sound, by means of the command source.

You can see the designs and the blocks below:


lunes, 18 de marzo de 2019

Father's Day key ring

Hi everyone!!

Today I present to you the development of a 3D key ring that I have modified for Father's Day.
You can use whatever you father likes.

On the back we have attached a parallelepiped, we have also written letters in relief, a heart and to finish a hoop.

Click here to see the design


Here you can see some pictures of it:


viernes, 15 de marzo de 2019

Embed code for a Scratch game to our website or blog

Hi:

Today I have embeed the football game I made with scratch in my blog and in my webpage.


The Html code is the following (you have to change the number of digits that appears in the web address, by the code of your game also te number of the width and height in order to fit in the space you want):


<link rel="stylesheet" href="style.css" />


    <iframe allowtransparency="true" width="250" height="250" src="//scratch.mit.edu/projects/embed/289214413/?autostart=false" frameborder="0" allowfullscreen></iframe>


lunes, 11 de marzo de 2019

Development of penalty shooters game with Scratch

Good morning.

Today we have designed a game with Scratch to throw penalties, it is multiplayer, (thrower with keyboard, goalkeeper with mouse) and although the blocks of the goalkeeper and the football boot are easy those of the ball can become more complicated.

We hope you like it.


Note: The scenario and gloves are drawn using the brush tools of the objects and scenarios.


These are the blocks for the ball:


The blocks for the boot are: 


The blocks for the gloves are:


lunes, 18 de febrero de 2019

Control of a servomotor with a potentiometer (variable resistance by turning it).

Good morning,

Today we show you how to control a servo motor from left to right by turning a potentiometer (variable resistance), left or right.

The signal from the potentiometer reaches the Arduino via input A0 (input pin A0).

The Arduino is programmed to rotate the servo by sending the signal through the output (output 0).

Here we have the base to control a turn of a steering wheel... For example of a lunar vehicle!

Click to see the circuit


viernes, 15 de febrero de 2019

Rover for Mars or the Moon

As a second practice with Tikercad design, today we present the 3D design of a rover vehicle based on a cube :

Click to see the design

Four images of the design from different points of view:


viernes, 8 de febrero de 2019

Principles of electricity-Ohm's Law


Voltage: It is "the force" with which the positive pole attracts electrons from the negative pole.  It is measured in volts. For example, a single battery has 1.5 V, a flask battery has 2.5 V and a rectangular battery has 9V.

Intensity: It is the flow of electrons that crosses a section of the conduits. It is measured in amperes. 1 Ampere is 1 Coulomb/second, where 1 Coulomb is a package of 6.25x10^18 electrons.

Resistance: They are elements that interrupt more (1 MOhm) or less (1 Ohm) the electric current.
The relationship between these concepts is given by Ohm's Law:


I= V/R


For the example on the left/up:
  • V= 9 volts
  • R=1000 Ohms
  • I= V/R = 9/1000 = 0.009A = 9 mA

For the example on the right/down:
  • V= 9 volts
  • R=100 Ohms
  • I= V/R = 9/100 = 0,09A = 90 mA


The results are slightly lower due to losses in contacts and cables.


lunes, 4 de febrero de 2019

Circuit with a photorresistor sensor

Hi.

Today we have made a circuit in which we could control the flow of electrons with a photorresistor sensor.


Click here to see the circuit


Programming a traffic-light with arduino

Good morning.

Today we have made a traffic-light with arduino.


Materials


  • 3 LEDS
  • 220 Ohms Resistor
  • Wires
  • Arduino
  • Breadboard

First the green LED will light up, then the yellow LED and finally the red LED, the process will be repeated indefinitely.


viernes, 1 de febrero de 2019

First microcontroller program - Blinker

Hi

Today I present you the first program with the Arundino microcontroller.
For this practice we used:


  1. LED diode
  2. Cables
  3. A resistance of 220 Ohms. (Not to burn the LED)
  4. An Arduino microcontroller.

Steps:


  1. We connect the positive of the LED to the 0 port of the Arduino.
  2. Connect the negative of the LED to the resistor.
  3. Finally the resistance to the GND port of the Arduino.
  4. We program by blocks so that the positive in the zero port opens 1 second, then closes 1 second, the program will be repeated infinitely, so the LED will be flashing.


lunes, 28 de enero de 2019

Parallel Circuit versus Series Circuit

Hi.

Today I'm going to show you a parallel circuit vs a series circuit.

Components:
  • 9V batteries.
  • Cables.
  • Motors.
  • Lightbulbs.
  • Multimeters.

In the parallel circuit the motor is faster and the lightbulbs are brighter.

Click here to see


viernes, 25 de enero de 2019

Two circuits with multimeters to observe the electrical parameters

Hi!!

Today we have practice making circuits with tinkerkad.

Electrical definitions:

  • ELECTRICITY: The flow of electrons from negative to positive pole in a conductor.
  • VOLTAGE: That force which is generated to cause current to flow in an electrical circuit. Voltage is measured in Volts "V".
  • INTENSITY OF THE CURRENT: Flow of electricity along a surface of conductor in a time. Current is measured in Amperes "A" = Coulombs/sg. 1 Coulomb= 6.242×10¹⁸electrons.
  • MULTIMETER: A testing device that can be set to read ohms (resistance), voltage (force), or amperes (current) of a circuit.


In the following circuits, we can see how the electrical parameters vary, when only the voltage or force of the battery changes. The circuit with the lower voltage battery will look less and have less intensity.


lunes, 21 de enero de 2019

Programming moana

Today we show you a new web site to practice programming with blocks.

Join Moana (Vaiana in Spanish) and Maui in an adventure game while learning all about loops, conditionals and the fundamentals of code. It is your Hour of Code!

Click here


Our fist circuit

Hello!

Today we have made a simulated circuit with tinkerkad.

The elements of the circuit were:

  1. Battery.
  2. Wires.
  3. Lightbulb.
  4. Pushbutton switch.
Operation: The electrons leave the negative pole attracted by the positive pole, in the filament of the bulb they collide producing heat by friction, then the filament becomes bright red, giving light.


lunes, 14 de enero de 2019

Presentation

Good morning!

Today I show you a presentation with transitions, animations and photographs. I have made it with Google presentations.

Here you can see the presentation:click here to see the presentation


viernes, 21 de diciembre de 2018

Light bot

Today we 've made an excercise of educational programing, tath consisted in controlling a cute lightbot:http:http://lightbot.com/flash.html

In my opinion it was a fun way to learn, but in somo stages there was a few space to add blocks. Also you learn to correct your mistakes and yo improve your technical skills, and were is left and right.


Final project

Hi! Today I show you my last project. I have developed it with scratch. In this year, we have learnt: Development of Applications for m...